Amy Warden’s December Soap Challenge: Straight Lines

Here we go again: my soap challenge # 4. I heard that this was going to be the last challenge that Amy Warden is going to host for the time being, so that was enough reason for me to get active one more time and try out this month’s technique! I have learnt so much from the few times that I participated and got so many ideas from just browsing the wonderful entries of the challenges over the last years… I will certainly miss this creative soap makers’ forum!

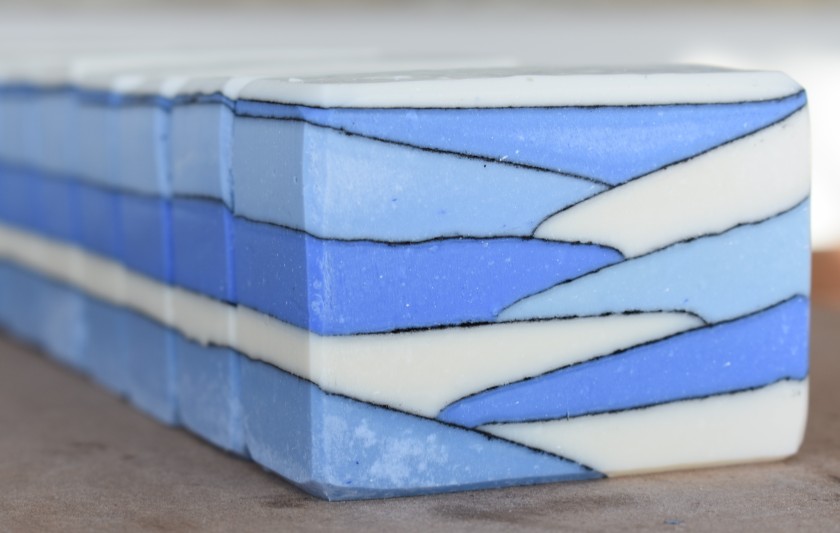
So, this is my entry soap called Winter Blues:

DSC_1268

Here are some more pictures:

DSC_1250

DSC_1246

Toni Watt from Australia introduced us to this month’s technique, showing us in her tutorial how to pour straight lines. This involved planning a clear-cut design, calculating exact amounts of all ingredients, leaving nothing up to chance etc.: a challenge to my usual free flowing, happily experimenting, turning into higgledy-piggledy adding stuff, turning into frantically stirring and glopping, turning into cramming everything into the mold sort of soaping process.

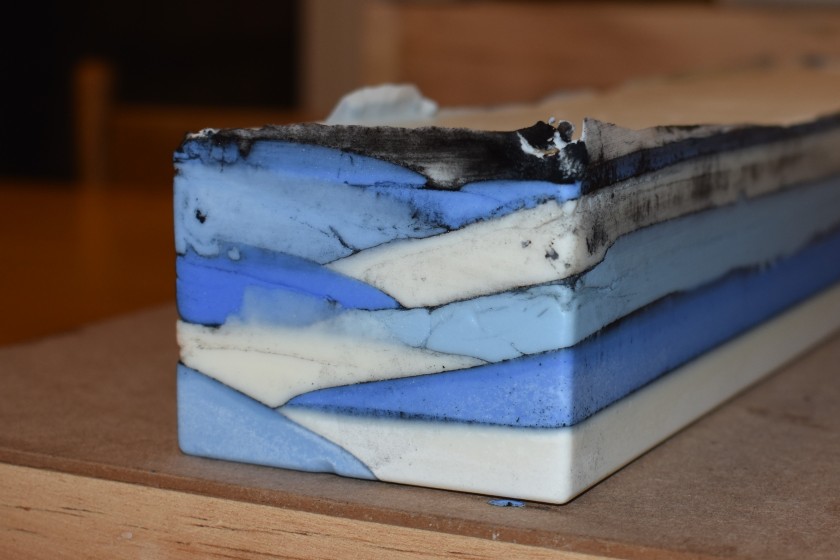
So, I went ahead and sort of followed Toni’s instructions. Sort of, because I did not have an oven at hand in my soaping area and did not want to lug everything upstairs and start experimenting in my kitchen with all my bouncy kids and pup around. Therefore, I was not able to do the CPOP part. Also, I did use my regular recipe, which includes a good portion of palm oil. Everyone had advised against it, as we were supposed to soap at cold temperatures and you can apparently end up with stearic acid spots using palm oil. I did not know what these spots are, and I also did not have the time or brain to figure out a new recipe, so I stuck to my ol’ faithful one. Well – now I do know what stearic acid spots are 😊. Here they are – you can see them best in the bottom left corner pour (light blue ultramarine):

DSC_1263

I did however follow the instructions when it came to prepping the lye-water-oil mix for each layer separately, and I also did soap at cold temps. At really cold temperatures! It was -19 Celsius that day outside, and my soaping area in our basement was not much warmer, so while wearing snow pants and many other layers I did true cold process soaping! I kept my lye water between 13-15 Celsius (that’s around 56 – 60 Fahrenheit), the oils were slightly warmer so as not to completely solidify.

I attempted an angled pour in different blues and white, each layer separated by a black mica pencil line. Colorants were Ultramarine Blue, Baby Blue Mica and water-soluble Titanium Dioxide in different combinations to create the various blue shades. I poured while propping the side of the mold up on boards of varying thickness and sometimes letting it rest horizontally. I went for ten layers, that was an easy number to divide everything by 😊. Each soap layer I sprayed with rubbing alcohol, dusted with Mica, and then sprayed again with rubbing alcohol right before pouring the next layer. I learnt somewhere that this helps the layers adhere to each other and have found it to be true (whenever I forget that step the layers always separate on me.)

DSC_1201

I used Peppermint Essential Oil and Eucalyptus Lemon Essential Oil to give the soap a nice, crisp scent that would work well with the ‘cold’ winter colors of the design. I have never had any trouble with these oils so I thought I’d stick to them in this experiment.

Having read from other people’s experience that this technique can take many hours (as each layer has to set before you can pour the next one) I did not attempt this at midnight like many of my other soaping projects… With one major interruption (picking up the kids from school) my soaping session did however not actually take too long, maybe 2 ½ hours. That is I think first because I did not attempt a whole lot of layers, secondly because I discounted the water quite a bit (water-lye ratio 1.5 : 1), and thirdly (and most importantly) I did use the stick blender 😊 as I could not get the colorants (esp. the Ultramarine Blue) incorporated properly without it.  – I did not want to start messing around with glycerin or extra oil and therefore blended the Ultramarine right into each layer’s oil mix. –  There was a clear problem in this – where my pencil lines did not end up straight is where my soap batter reached too thick of a trace thanks to the stick blender and I could not pour it completely evenly.

I also added sodium lactate, which was not only unnecessary but in this case a mistake as I did not get to unmold and cut the soap soon enough and ended up having trouble cutting it. Here are some more pictures:

Unmolding – nice and messy with all that mica dust 😊!

DSC_1217

Wohaa…

DSC_1214

First cut – beautiful lines and colors inside 😊 !!! Can’t judge a soap by its outside…:

DSC_1218

The soap was very hard to cut due to the water discount and the added sodium lactate…the edges were brittle and needed a major clean up:

Here are the cleaned up bars – the lines on the side of the soap ended up being nice and straight… The tilted lines on the front side still need some help, i.e. a more fluid batter…:)

I really liked the way the colors turned out and the stained glass effect the black mica lines gave to the soap! The design recaptured the feeling on that cold, snowy winter day for me quite well :)!

For the next time I try this technique I have a few things I would do differently:

  1. Skip the palm oil and avoid stearic acid spots.
  2. Skip the sodium lactate when water discounting as much as I did to avoid soap that is hard to cut and will end up with brittle edges
  3. Give myself more time and either skip the water discount/stick blending to make sure the batter stays more fluid or use a fragrance that slows down trace so that each layer can be poured smoothly. Again, all that depends on the recipe.

Thanks again, Toni, for teaching us this technique and Amy, for hosting this challenge one last time!

Conny


Rustic Soaps & Packaging – Soap Challenge April 2017

This month I sort of stumbled into this challenge. I had not really intended on participating as I was not familiar with hot process/rebatch soaping and also simply lacked design ideas. So I planned on just watching what the others come up with and learn from a distance…

However, I managed to ruin two entire 3-pound batches of honey & beeswax soap last week…ugh! They were still usable but with the partial gelling my freezer had not been able to battle the design I had had in mind did not work out. What an extravagant waste of ingredients… Therefore I finally found myself looking into rebatching techniques.

The first rebatch went wrong too – I added too much liquid and ended up with wonky bars, odd texture and weird feeling lather. I had tried to throw in some rose petals and Himalayan pink salt to improve appearance, believe me, it did not help.

The second rebatch I did around the time that this month’s final chat forum was done and was able to use some of the tips and tricks the ladies shared about hot process & rebatch soaps from the transcript. I am glad to say the second rebatch attempt worked out much better! The base soap recipe is all natural and unscented to cater to those with sensitive skins and who cannot handle scent. Ingredients are olive oil, coconut oil, palm oil, castor oil and beeswax, distilled water and honey. When I rebatched I added distilled water and coconut cream (50/50) as a liquid and kept it at 8 oz of liquid to 3 lbs of soap.


So long story short, this is how I ended up with a rustic looking honey and beeswax soap…IMG_6901

…and when I decided to actively join the challenge for this month:).

Obviously I had to figure out how to spruce up this plain old soap a little. I found a Spellbinder’s Embossing Folder that had served me well for many crafts. I really like the musical design! Today it would be used in my soaping for the first time!

IMG_6903

Let’s see how it goes! I rubbed some glycerin onto the raised parts of the plastic folder and then dusted it with dark cocoa powder.

I used a rubber mallet (can’t get much more rustic than that! :)) to – gently – tap the pattern onto the surface of my soaps:

It actually worked quite well! I had to redust the folder for each soap but it was no problem getting the image onto the soap. Sometimes I had to wipe down the surface of the soap a little with a clean, damp cloth to make the dark musical lines pop out more.

Then I got out some more of my paper crafting tools (die cuts, punches, distress inks etc.) and designed the wrapping for the soap. Here is the end result, my Soap Opera Bar:

IMG_6928

Here are some more pictures of the bars:

So again I am really glad I got inspired to try and do my best at rescuing a batch of failed soap – instead of tossing it out. Now if you’ll excuse me, I have to go practice singing those lines in the shower…;)

Bye for now,

Conny


PS: I forgot to mention in my original post: I used the raised side of the embossing folder to be able to use it as a stamp and that is why the image ended up being mirrored. Otherwise I would have had the image colored with cocoa powder in the negative spaces, which I guess is ok but not the look I was going for. I like the musical notes being the colored part. Also the powder would have rubbed off much easier if it had not been engraved into the soap this way. In general this kind of embossing folder works great but you could decide to use one that has a pattern where it does not matter if the image is mirrored or not :)!

Secret Swirls Challenge 2017

Today I am going to add my soap “Pink Star Burst” to the March 2017 Soap Club Challenge hosted by Amy Warden. We were instructed to try out the “Secret Swirls” technique, also sometimes called “Secret Feather”.

I decided to make a soap for the girls in my life 🙂 – my two daughters and two nieces. The young ones will love the pink and gold and the stars…and the oldest one might forgive me that color scheme, despite all the growing up that she does so successfully :)!

I first created a pink star embed using the long mini star silicone mold, and after curing for a few days dusted it with Dark Gold Mica.IMG_6706


Then I tried out the new technique and learnt a few crucial things:

First, you need a recipe that does not trace too quickly but remains fairly fluid. Mine was not the best for this technique – I ended up needing to hurry up a lot and still only plopped instead of poured the last bit of the batter in the mold. So next time I think I will up the olive oil content of my recipe. Amy had also suggested to use some powdered sugar to slow down trace which of course I forgot in the heat of the struggle :).

Second, for the secret hanger swirl it is good to have a hanger tool that is not too thin in order to leave a visible pattern. I made my own hanger tool by bending an actual hanger into shape and at first the wire was too thin.The Soapqueen however had a great tip on her website, slipping a straw over the hanger, so that ended up being my solution.


I did not use partitioning cardboard as I wanted the swirl to be a little freer. By the time I had poured all the batter the soap had already firmed up enough that I was able to put the star embed on top right away. Dusted the whole soap with more gold – DONE…

My son helped me cut it – he was so proud of himself :)!

Now I hope the girls will like it, too…:)

IMG_6748


IMG_6750

Thanks for teaching me another fun technique, Amy!

Conny


CP & MP Design Challenge Feb 2017 (Amy Warden)

So here we go again! Another soap challenge, this time combining Cold Process (CP) and Melt and Pour (M&P) in one soap. Always wanted to try it, because I liked the thought of combining a translucent M&P Base with the regular opaque CP recipes. Should make for a very nice design!

Did not realize how unpredictable the whole thing can be…:) M&P cools off really fast, so performing a nice drop swirl design is a challenge. Also scents and colorants behave slightly different in M&P than in CP, so cutting into the soap revealed some surprises and after a couple of weeks curing there were even more surprises, as the colors kept changing on me!

Anyway, my idea was to celebrate the Canadian tradition of Maple on Snow: pouring hot maple syrup on fresh, white (!!! :)) snow, and when it cools off, rolling the little treat up on a popsicle stick. Eat. Tastes delicious and looks wonderful. Amber maple syrup running across white snow, resulting in this sweet toffee, is a beautiful color combo.

So that was what I was going for, deciding to use dark gold and bronze mica to colour my maple syrup scented, translucent Melt and Pour base.

gold-mp-base

I had also prepared some melt and pour embeds the day before, in the shape of maple leafs, that I was going to stick into the top of the soap loaf.

Here is a picture of the finished embeds:maple-leafs-embeds

The color turned out nicely and according to my oldest daughter they smelled great :)!

I prepared my CP soap recipe, including the regular palm oil, coconut oil, olive oil and castor oil. Whitened it with Titanium Dioxide to make it look like snow. Scented it with just a hint of peppermint essential oil to somehow include that crispy, cool feeling, not that snow smells like peppermint, but anyway :).

I used a tall and skinny mold and started pouring a layer of the CP soap. Dropped and drizzled the gold and bronze mica colored M&P base in, alternating with the CP soap. The M&P did not really swirl down deep as it hardened very quickly but that was ok, Maple on Snow is anyway really meant to stay on top of the snow :).

pouring-mp-into-cp

Topped the whole concoction off with my maple leaf embeds – done.

Here is a picture of the freshly unmolded soap:

unmolded-soap

After a few days of curing the M&P had darkened a LOT – maybe due to the micas and the maple syrup fragrance ? -so this is what the bars look like now:

img_6480finished-bar

The soap smells great, looks pretty nice too, just not what I was going for with the darkened M&P :). I am surprised the leaf embeds (containing the same micas and scent!) did not change color. The whole thing is very befuddling…

It has less the look of Maple on Snow but more of dark roots tangling between snowy drifts and a maple leaf sunk into the top. Still quite Canadian, though, eh ;)!

Thanks for another great challenge idea, Amy Warden, I will definitely have to give this another try!

Conny

Amy Warden’s January 2017 Soap Challenge

The Collaborator’s Challenge

This is my friend J and me!

(I’m the one with the brown hair and the weird glasses, if you can figure out who I mean…)

_mg_6137

C (left) and J (right) in full soaping gear!

We got together for an evening of soaping for the Amy Warden Collaborator Challenge.

I have been making soaps from scratch for a little over a year and have been ogling Amy’s Soap Challenge Club entries with wide eyed admiration, so far not daring to participate… J – my enthusiastic, DIY, go-getter neighbor had taught me how to do some wood working over the past few years. In return I had her join me on three different soap making occasions last year to teach her what I knew about soaping!

So, she was my go to partner, when I finally got my courage together to sign up for Amy’s challenge and needed a collaborator. J at that time had made enough soap to know the basic safety rules about handling lye, she was still excited enough about making soap to try a technique that would be new to both of us, AND cram in a few evenings to get everything done within the deadline! And she is fun to be with when working hard, which really cannot always be said about me when I get into a work frenzy…:)! – What more could I ask for?

So here we are:

Kids in bed, husbands disappeared, hamsters and dogs locked away.

PLAN:

We will make an activated charcoal soap, going for the cleansing, detoxifying properties and the dramatic effect of this natural colorant. Hopefully it will not end up a gloomy looking kind of soap :), but more sophisticated, with a touch of gold mica, adding interest with a combing technique and so on. That’s what we are hoping for!

Unscented, as we really don’t have an idea what scent would go well with a black soap. I am not very adventurous with regards to scents, and J wants to give one of these bars to a friend who is allergic to all kinds of scents and essential oils, so there we go.

Our recipe is fairly straightforward, containing olive oil, palm oil, coconut oil, avocado oil and castor oil, and we soap at around 110°F.

FIRST TRY:

The “Roman Bath Bar”

The combing technique sort of worked, as you can see in the up and down movement of the mica pencil line reminding of a battlement. We used the blunt ends of our DIY wood picks comb to create this decorative border through the middle of the bar. We had feared that the top layer was not fluid enough to flow evenly into more pointy crevices so we had decided against using the spiky end of our comb.

We did change our mind in the end though as we would like the pattern of our final soap to be less meander art like but spikier, so the next time we wanted to give the pointy ends of the comb a chance.

Other changes we planned to make: The mica lines should be more prominent, and also the contrast we had hoped for between the bottom layer (intended to be grey) and the top layers (black) has to be more noticeable.

So we had another go at it:

SECOND TRY (CHALLENGE ENTRY)

This time we mixed only a pinch of charcoal into the lye-oil mix, and then – right after reaching very thin trace – split half the batch off and added more charcoal to get a much darker shade for the top layer.

As we intended to use the pointy end of our DIY comb we needed to make sure that the first layer with the comb marks would be firm enough to hold its shape whereas the second layer on top would have to remain fluid enough to actually flow into those narrow cracks. So the first, grey half of the soap batter was whipped into submission by J and the stick blender, until even flinging it across the room could not have changed its shape any more. Those comb marks stayed right there!

We then sifted the gold mica across the surface, making sure to tilt and angle the soap to get the mica into each crevice. Sprayed it with alcohol. J then poured the second, blacker half which we had left at a much thinner trace into the lines.

_mg_6172

Not surprising with this design, we had to hit and tickle a lot of air bubbles out of that soap!

Again we topped it with some more mica. DONE!

_mg_6182

Insulated it for a day and then cut it.

This is the result, the “Gold Dusted Rocky Ledge” :):

_mg_6396
J is extremely handy with her camera so she did the final photo shoot with our bars.


Although there are still some air bubbles in the final soap, most of the top layer had sunk neatly into the comb pattern. This time around we had been a little more liberal with our use of mica, making the sparkly pencil line more noticeable, without using too much and making the layers come apart! The grey – gold – black contrast worked very well in creating a bar with clearer and crisper lines.

After us making this bar I personally decided that I still like my bright colors 🙂 and may try this technique with blue, silver and green or red, gold and orange/yellow. And of course, I have a house full of kids who love colors and are not thrilled by black and grey.

However, I am glad we figured out together how to get the combing technique done and we did end up with a very neat bar of soap, very different to my regular swirling/layering designs.

Thanks so much for coming up with the idea for this challenge, Amy Warden!

Conny